Week 1 CAD:
Documentation for Fusion 360👀💬
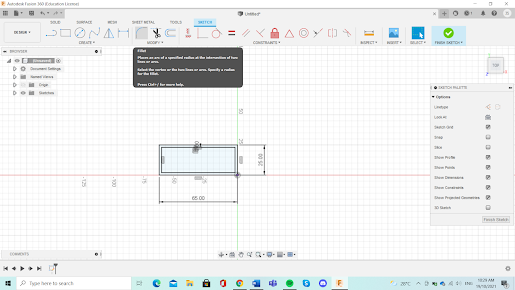
When you open fusion 360, it opens a new project. To start
off, a sketch design is needed so above the create tab, press “SKETCH”.

Since the object I have in mind is a key chain we need to
sketch out the keychain there the base of the keychain is sketched out first.
The base is measured out to be 25 mm to 65 mm.

After sketching the base of the keychain, use the “OFFSET”
tool to separate the base into a bigger and smaller rectangle with a 2mm gap.

This is what the sketch looks like after using the offset tool

Thereafter, by using the “FILLET” tool🗡 the edges of the
keychain are rounded off with a 5mm radius in the sketch. Having sharp edges on
your keychain is definitely not shiok.💀
This is what the sketch will look like after using the fillet tool.

Next, use the ‘LINE” tool to a line approximately at the ¼ point
of the inner rectangle.

Right click the line and choose the “ NORMAL CONSTRUCTION”
option.

After that, use the “SKETCH DIMENSION” tool to and input the dimension value of 7mm.


This is what the sketch will look like after defining a 7mm distance

We have to make the keyhole for the keychain otherwise it wouldn’t be called a keychain hence, to start, we first choose the “POINT” tool under the create tab

Set the point on the line that was previously sketched using
the “CREATE DIMENSION” tool and we can make the keyhole via the “CENTER
DIAMETER CIRCLE” tool.

This is what the sketch will look like after the keyhole is sketched out.

Now for the even more exciting part! We get to personalise
the keychain by putting our name on it. To do so, select the “TEXT” tool under the create tab.

Since my name is Jerome, I will put in my name and try to
centre it in the middle of the keychain. And we’re done with the sketch and can
go ahead to press the “FINISH SKETCH” button

After finishing the sketch, it is time to make this 2D
sketch into a 3D sketch! We start off by clicking the “EXTRUDE” button and
selecting the inner section of the keychain.

After extruding the sketch transforms from a 2D sketch to a 3D sketch. Time to add the details!

Under the document tab we can hide the 3D sketch and
continue to work on the 2D sketch by pressing the “eye” icon beside the “bodies”
tab. Now, to add in the details, we also need to extrude the outer area of the
key chain and the name. Set the offset to 3mm and distance to 1.5mm and the
details will be added to your 3D sketch.


Finally, this is what your keychain will look like after
hiding the sketches.😆😲
Week 2(CAD):
We learnt about laser cutting and how to turn 3D designs using parametric drawing into real life objects!😆 So, we were tasked to make a handphone stand for this week and the best design would get their design laser cut out.
The design I went with is simple and yet interesting. A stickman sitting down is the design I went with for the handphone stand😂.
So, first we need to open up fusion 360 and use the "CREATE SKETCH" tool and select a plane to sketch on


I used to think that parametric drawing was a hassle and very annoying😿 but, after actually using it, now I think that in the long run it makes everything more convenient and efficient😺 because I can make adjustments very quickly. So next I will try to always implement parametric drawing wherever possible.
No comments:
Post a Comment